In printing, “bleed” refers to the area of a design that extends beyond the final trim edge of a printed piece to ensure there are no white borders after cutting.
It allows colors, images, or backgrounds to run off the page so the final product looks seamless and professionally finished.
Imagine designing a beautiful full-color flyer with a background that goes edge to edge. You send it to print, receive the final product, and notice thin white lines along the borders. Frustrating, right?
That happens when bleed is not included.
Printing machines are not perfectly precise down to a fraction of a millimeter. When paper is trimmed to its final size, even a tiny shift can reveal white edges. Bleed prevents this issue by extending the design slightly beyond the cut line.
Whether you are a graphic designer, small business owner, or marketing professional, understanding bleed ensures your printed materials look polished and professional.
If you have ever ordered business cards, brochures, flyers, or posters and heard the printer mention “add bleed,” this is what they meant. Bleed is a small but crucial detail in professional print design that prevents unwanted white edges.
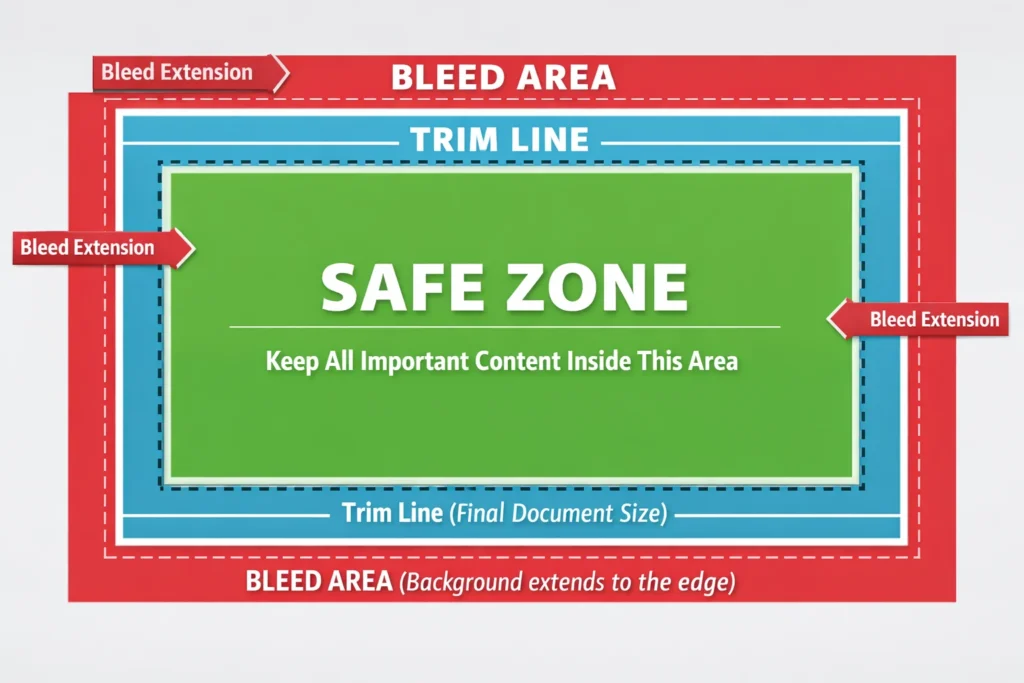
What Exactly Is Bleed in Printing?
Bleed is the extra margin of design that extends past the trim size of a printed piece.
Most printers require:
- 0.125 inches (3 mm) bleed on each side in the United States
- 3 mm bleed in most international print standards
This means if your final brochure size is 8.5 x 11 inches, your design file should actually be 8.75 x 11.25 inches to include bleed.
Key Printing Terms Related to Bleed
Understanding bleed becomes easier when you know these related terms:
| Term | Meaning | Why It Matters |
|---|---|---|
| Trim Line | Final cut size | Where the paper will be cut |
| Bleed Area | Extra design beyond trim | Prevents white borders |
| Safe Zone | Area inside trim | Keeps text from being cut |
| Crop Marks | Guides for cutting | Shows printers where to trim |
Bleed works together with trim lines and safe zones to ensure professional results.
Why Is Bleed Important?
Here are the main reasons bleed is essential in printing:
- Prevents white edges after trimming
- Ensures color runs smoothly to the edge
- Creates a professional, polished look
- Compensates for slight cutting shifts
- Meets commercial printing standards
Without bleed, even the best design can look unfinished.
Example of Bleed in Action
Let’s look at a simple example.
| Scenario | Without Bleed | With Bleed |
|---|---|---|
| Full background flyer | Thin white border may appear | Color extends perfectly to edge |
| Business card | Uneven edges possible | Clean edge-to-edge finish |
| Magazine ad | Risk of misalignment | Professional seamless layout |
If your background is white, bleed may not be noticeable. But with colored or image-heavy designs, bleed is critical.
How to Add Bleed in Design Software
Most professional design programs allow you to add bleed when setting up your document.
Common software settings:
- Adobe Illustrator: Set bleed in document setup
- Adobe InDesign: Add bleed in new document settings
- Canva Pro: Enable bleed under print settings
- Photoshop: Increase canvas size and extend background
When exporting for print, always choose “Include bleed” in the PDF export settings.
Common Mistakes Related to Bleed
Many beginners misunderstand bleed. Here are common errors:
- Adding white margins instead of extending design
- Forgetting to extend background images into bleed area
- Placing important text inside the bleed zone
- Ignoring printer bleed requirements
Remember, text and logos should stay inside the safe zone, not in the bleed area.
Bleed vs Margin vs Safe Zone
These three terms are often confused. Here is a simple comparison:
| Feature | Bleed | Margin | Safe Zone |
|---|---|---|---|
| Location | Outside trim | Inside trim | Inside margin |
| Purpose | Prevent white edges | Visual spacing | Protect important content |
| Size | Usually 3 mm | Varies | Usually 3 to 6 mm inside trim |
Bleed extends outward. Safe zone stays inward.
Real World Printing Examples
Here is how bleed applies in different projects:
- Business cards with color backgrounds
- Wedding invitations with full-bleed artwork
- Posters and event flyers
- Product packaging
- Magazine covers
- Book covers
Professional print shops almost always require bleed for edge-to-edge designs.
Polite and Professional Alternatives
When communicating with clients, printers may use clearer terms instead of just “bleed.”
| Term | Meaning |
|---|---|
| Edge-to-edge printing | Color extends fully to edges |
| Full-bleed design | Design runs beyond trim |
| Print margin allowance | Extra cutting space |
Using simple language helps non-designers understand the concept.
FAQs
- What does bleed mean in printing?
Bleed is the extra design area that extends beyond the trim edge to prevent white borders. - How much bleed should I add?
Most printers require 0.125 inches or 3 mm on each side. - Is bleed necessary for every print project?
It is required if your design goes to the edge of the page. - What happens if I don’t include bleed?
You may see unwanted white edges after trimming. - Does bleed increase file size?
Slightly, because the canvas size becomes larger. - Should text go into the bleed area?
No, important content should stay inside the safe zone. - Can home printers use bleed?
Home printers usually cannot print full bleed unless specifically designed for it. - Is bleed the same as margin?
No, bleed extends outward; margins are inside the trim area.
Practical Tips for Perfect Print Files
- Always check printer specifications before exporting
- Extend backgrounds and images fully into bleed
- Keep text at least 3 to 6 mm inside the trim line
- Use high-resolution images for professional results
- Export as print-ready PDF with bleed included
These small steps make a big difference in final quality.
Conclusion
Bleed in printing is a simple yet powerful concept that ensures your designs look professional and seamless. By extending your artwork slightly beyond the trim edge, you eliminate white borders and compensate for cutting variations.
Whether you are printing business cards, brochures, posters, or packaging, including bleed is a standard industry practice that guarantees polished results.
Once you understand bleed, your printed materials will instantly look more refined and professionally produced.
Discover More Related Articles:
- Perseverance Mean in the Bible: Lessons from Paul, Job, and Jesus for 2026
- Subdue Meaning in the Bible: Lessons for 2026

Madison Taylor is an experienced content writer who focuses on researching and explaining word meanings, slang, and texting terms. She writes for meanvoro.com, creating clear and accurate to help readers understand language easily.